Jelly Bean Explosion Cake
Celebrate Easter with a delicious Jelly Bean Coconut Cake full of flavor and a fun jelly bean surprise inside.
Equipment
- 2 8" Cake Pans round pans
- Hand Mixer or stand mixer
- Bowls, measuring cups and spoons
- Whisk and silicone spatula
- 3 ½" round cookie cutter to make hole for jelly beans in cake layers
- Knife to split cake layers
- Metal offset spatula
Ingredients
Vanilla cake
- 3 Cups All Purpose Flour
- 2 ½ teaspoons Baking Powder
- ½ teaspoon Salt
- 2 Cups Granulated Sugar
- 4 Large Eggs Room Temperature
- ⅔ Cup Vegetable or Canola Oil
- ⅔ Cup Whole Milk Room Temperature
- 1 ½ teaspoon Vanilla Bean Paste or Vanilla Extract
- Optional: food coloring use your choice of food coloring
Cream cheese frosting
- 1 Cup Cream cheese, full fat softened (note - one cup equals one 8 ounce package)
- ¾ Cup Powdered sugar
- 2 Cups Heavy whipping cream softened
- 1 teaspoon Vanilla bean paste or vanilla extract
Jelly Bean Filling & Coconut Covering
- 2 Cups Jelly beans
- 2 Cups Coconut Shredded
Instructions
Vanilla Cake
- Prepare two 8-inch cake pans by lining with parchment paper or coating with baking spray.
- Combine flour, salt and baking powder in a bowl. Sift if necessary to remove any lumps. Set aside for later.3 Cups All Purpose Flour, 2 ½ teaspoons Baking Powder, ½ teaspoon Salt
- Combine milk and vegetable oil in a separate bowl. Set aside for later.⅔ Cup Vegetable or Canola Oil, ⅔ Cup Whole Milk
- Add sugar and eggs to a mixing bowl. Whisk until well combined and the mixture is pale (approximately 2 minutes). Note - an electric hand- or stand-mixer may also be used.2 Cups Granulated Sugar, 4 Large Eggs
- Add vanilla bean paste or vanilla extract to bowl and mix until combined. Scrape sides of bowl with a spatula as needed.1 ½ teaspoon Vanilla Bean Paste or Vanilla Extract
- Add one-third of the flour mixture and mix until combined. Add one-half of the milk and vegetable oil and mix until combined. Add another third of the flour mixture and mix till combined. Add the remaining oil and milk and mix till smooth. Finally, add remaining flour mixture and mix until combined.
- Optional: add a few drops of food coloring of your choiceOptional: food coloring
- Divide cake batter equally between two 8” pans.
- Bake at 350℉ (177℃) for 35 - 40 minutes, or until a toothpick inserted in the center of the cake comes out clean.
- Place pans on a wire rack and allow to cool completely before unmolding.
Cream cheese buttercream
- Place room temperature cream cheese in bowl of a stand mixer fitted with the whip attachment.1 Cup Cream cheese, full fat
- Add powdered sugar and vanilla to bowl.¾ Cup Powdered sugar, 1 teaspoon Vanilla bean paste or vanilla extract
- Begin mixing on low speed and gradually increase speed to medium.
- Continue to mix until no lumps are present (2 - 3 minutes). Scrape the side of the bowl if needed.
- With the mixer running on medium speed, slowly begin pouring heavy cream into mixing bowl. Be sure to pour slowly over the period of 1 - 2 minutes.2 Cups Heavy whipping cream
- Increase mixer speed to medium-high. Continue to mix until stiff peaks form. The icing is now ready to be used.
- Refrigerate icing if not using immediately.
Cake Assembly
- Carefully trim the dome off of each cake to create a flat surface. Then, slice each cake in half horizontally for a total of 4 layers.
- Place layers on a serving platter.
- Remove the top layer and set aside for later.
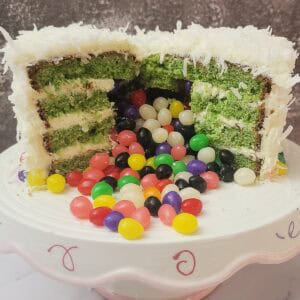
- Using a 3 ½-inch round cookie cutter, cut a hole in the center of the remaining three cake layers. This will create a space for the jelly beans to be poured into later.
- Remove the two top cake layers and set aside (you should only have one layer of cake on your serving dish).
- Add a smooth ¼ inch layer of the cream cheese buttercream on top of the cake. Sprinkle generously with toasted coconut.
- Place the second layer of cake over the buttercream ensuring it’s centered and level – and repeat the process of adding cream cheese buttercream and coconut
- Repeat again for the third layer of cake.
- Add jelly beans to fill the hole in the cake2 Cups Jelly beans
- Add the final layer of cake, and ice the top and sides of the cake with a smooth layer of buttercream.
- Gently press shredded coconut up the sides of the cake and sprinkle over the top.2 Cups Coconut
- Decorate as desired - consider adding more jelly beans, making buttercream flowers, or placing bunny Peeps on top.
- Slice, serve and enjoy!
Video
Notes
- Storage: To keep your Jelly Bean Cake fresh, store it in an airtight container in the refrigerator for up to four days. When you're ready to serve it, take the cake out about an hour beforehand so it can warm up to room temperature. This helps bring out its rich flavor and soft texture.
- Be sure not to cut a hole through the top layer of the cake—you’ll need it intact to keep the jelly beans securely inside.
Nutrition
Calories: 736kcalCarbohydrates: 96gProtein: 9gFat: 40gSaturated Fat: 20gPolyunsaturated Fat: 8gMonounsaturated Fat: 9gTrans Fat: 0.1gCholesterol: 128mgSodium: 302mgPotassium: 198mgFiber: 2gSugar: 57gVitamin A: 949IUVitamin C: 1mgCalcium: 127mgIron: 2mg
Tried this recipe?Let us know how it was!